Shiftin2Gear

Inverness, Citrus County FL, Home of quality, quick, affordable automotive repair and maintenance  


How To Successfully Check Transmission Fluid Levels
Feb
1
to Feb 28

How To Successfully Check Transmission Fluid Levels

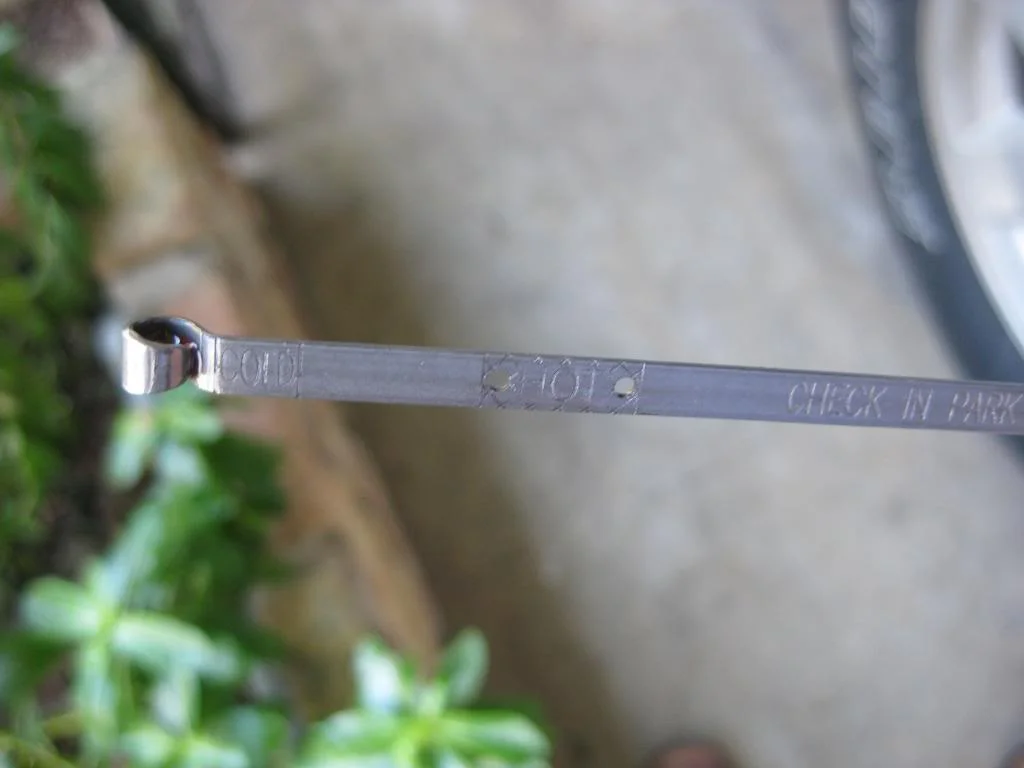
The past couple of weeks we at Shift Into Gear have been working on quite the amount of transmissions. As we embark on all different kinds of forums and engage in conversation and overhear folks including some of our customers speak with uncertainty about the proper way to check the fluid level on a vehicle, we have decided to say a thing or two about this impactful action that could potentially save you thousands. So First things first. CHECK THE OWNERS MANUAL! There is no exact way to check the fluid levels in a transmission, it does not mean that there is not a lot of similarities in the process depending on vehicle but there's "no rule of thumb" per say. We recommend that wen you check the fluid have plenty of natural light, make sure the vehicle is on level flooring (no hills or inclined driveways) and have a clean cloth or shop towel handy and a partner to help supervise. When preforming this task make sure your vehicle is running and has reached normal operation temperature. Now the next few steps can be found on the vehicles owners manual and/or the physical transmission dipstick. you will either place the vehicle in neutral position (have a partner in the vehicle with the foot on the brake) and check levels. (the dipstick will show indicators of where the normal levels should be) and the other position is leaving the vehicle in park. Every vehicle has a specific protocol. So please be sure to check the owners manual and/or the dipstick. Warning signs of low transmission fluid are sluggish or no response. Hard thrusting motion/action when the vehicle is placed into gears Drive, Reverse etc. And if your transmission light shows up on your instrument panel. All could be symptoms of low fluid levels. 

View Event →
What Do Oil Numbers Mean ?
Jan
1
to Jan 31

What Do Oil Numbers Mean ?

In this month Event Topic we are going to go over how to translate what the numbers & letters mean on a jug of oil. In any typical oil brand you have two sets of numbers, a dash and a letter. Keep in mind oil is defined totally on viscosity so both sets of numbers will be based on this fact. What is Viscosity. Viscosity is the resistance of liquid to flow. So water has a lesser viscosity than molasses because it flows easier in travel.  Our example will be 10W-40. We will start with the definition of the letter "W" and what it stands for. So the letter "W" stands for Winter. Not weight or watts or whys... nothing more, nothing less. So the number right before the "W" states that at the coldest temperature (hence the winter part)  the oil was engineered at will have a viscosity of 10. At the complete opposite side the higher number indicates the less viscosity the oil will have at high temperature. Once again it depends on what that company engineered the oil temperatures to be. Different brands will have different levels oil operating temperatures, which will cause their viscosity.

View Event →
To Flush Or Not To Flush That Is The Question
Nov
1
to Nov 30

To Flush Or Not To Flush That Is The Question

A transmission to a vehicle is extremely vital. If you don't have a healthy, well maintained transmission you will have a hard time putting the power your vehicle generates to the pavement and get moving. So for most customers the question is always, "What do I do to maintain my transmission?!" Well the answer is very simple. Its actually as simple as two steps.

1. Check the owners manual. The reason we say this is because not all vehicles are required to maintain the transmission and its fluids. They are built/filled to last the lifetime of the vehicle. They have very few if not any contamination opportunities and they come pre filled with all the fluid the car will need for the course of the vehicles life., Unless it generates a loss of fluid. (In that case just call us!) You will find also what kind of fluid it takes, ATF or ATF+4 Etc. The manual can also provide information and tips that could potentially save you same change and headache.

2. Determine What service to preform. There are two common fluid services to preform on a transmission. A Fluid Change & A Fluid Flush. One is more effective than the other and one also takes a lot longer. Now regardless of which one you preform you need to make sure you change out the transmission filter. Most common vehicles will have the filter inside the transmission itself and is accessible when the transmission pan is dropped. A fluid change is basically dropping the pan and allowing the fluid to drain via natural gravity. HOWEVER this only changes up to 47% of the fluid due to the fact that the rest of the fluid is in lines and also in the torque converter in the transmission.

A fluid flush is when all the fluid is completely taken out and replaced but the process is not that literal. Most Automotive Shoppes have a suction pump machine that pumps the fluid right out and replaces it with all new fluid. But if you are a DIYS kind of person (our favorite customer) all you need to do is get your self two containers with a capacity of at least a gallon (two milk jugs) will do the trick. Identify where your vehicles transmission lines are located (usually two, a feed and a return) disconnect them and make sure to have a drip pan ready. You might need to run to the automotive store (advance or advance) and grab 2 sections of hoses, about 5 feet long a piece, one size larger than the diameter of the lines on the vehicle and clamp them to the ends of those lines. Make sure to label each one properly Feed & Return (if you don't know which is which don't sweat it you will find out when the return line starts puking up the fluid hence milk jug time)   you want to place the return line in the empty container and the feed line in a fresh 5 QT jug of the proper transmission fluid. At this point you should have a buddy sitting in the vehicle cycling through the gears with the car on and the foot on the brake. When you are running low on fresh transmission fluid, turn off the vehicle swap out the containers and continue the process. Once you have cycled 8 to 13 QT's of fluid you have successfully flushed the system! Before you call it quits Make sure to leave the car on idle and check the fluid consistently add as needed. once you reach your specified fluid level you are done!

 Preforming this simple yet impactful service can maintain your vehicle running and driving great!


Please Note: This topic only refers to AUTOMATIC TRANSMISSIONS. NOT MANUALS

View Event →
Types Of Fluids & When To Check
Oct
1
to Oct 31

Types Of Fluids & When To Check

For the month of October we are going to talk about common Fluids and how frequent you need to visually check them. ( Note: Vehicles have scheduled maintenance charts that specify specific times or measured miles to check fluids. Our Tips are for general knowledge. Prior to checking your vehicles fluids please make sure to check and learn your service manuals.)

1. Motor Oil

2. Transmission Fluid (Automatic Transmissions)

3. Gear Oil (Manual Transmissions)

4, Brake Fluid

5. Radiator Coolant

6. Power Steering Fluid

7. Windshield Wiper Fluid

8. Fuel

We must say in a perfect world, we can jump in our cars, turn them on and drive with out having a worry.... but we can safely say, that is not the case. What happens if your radiator hose developed a leak and over night you lost more than 50% of your radiator coolant. If you turned on your vehicle and drove off you would be in a lot of trouble 10 minutes into your trip. We would like to say it wouldn't be practical to check all of your vehicles fluid levels prior to taking a trip to the grocery store every time (which we might add is only a mile down the street). What we can say is be aware of your gauges at all times and also while pulling out of your driveway, glance at the area your vehicle was parked on and watch for stains or puddles of any sort. Being aware is the first step.

You should check these fluids constantly.

Your Vehicles Motor Oil levels (Dipstick)

Your Vehicles Radiator Coolant (Cap)

Your Vehicles Transmission Fluid. (Dipstick)

Note: When checking fluids that have a dipstick please make sure to check both the front side and the back side. What you are looking for is to have the same fluid marking on both sides to ensure an accurate reading.

View Event →
Turning The Key
Sep
1
to Sep 30

Turning The Key

A lot happens with the turn of the key in a vehicle. You can say it is the same as a human opens their eyes for the first time as they wake up from sleeping. A human usually does not wake up running out the door into society without going through some steps first. Like us humans, vehicles are very similar even though the process for vehicles is a lot faster. The turn of the key in a vehicle is very important. The most common mistake folks make, is get in the vehicle and immediately turn the key and with out hesitation start the vehicle. However there are some steps we can do to prolong the life of our vehicles & parts. It is a proven fact that the cold start of a vehicle is when the most wear happens in an engine and its components. A study has proven that by doing 2 simple steps prior to the turn of the key will help reduce wear.

1. Before even inserting the key, make sure all major A/C settings are on the off position.(if you have a digital display similar to a Toyota Prius, this process would have to be conducted prior to turning off the vehicle) What this causes is the A/C compressor not to turn on with the rest of the vital components of the vehicle, Alternator, Water Pump, Power Steering Pump etc. This initially saves the car extra power on the first motor rotation that is necessary to start the vehicle. Causing less strain.

2. When you insert the key in the ignition you want to turn the key to the position right before you turn to start the engine. You want to wait 7 seconds before you actually turn the car on. The action this causes is called "Priming". One of the first things that turns on in any vehicle is the fuel delivery system (Fuel Pump in most cases) The pump will run until a desired pressure of fuel is present. When this pressure is achieved the pump will turn off and the pressure will hold for roughly 30 seconds before the return valve in the system disengages and releases the fuel and the fuel travels back into the gas tank. After the 7 second wait and before the 30 sec mark you can start the vehicle minimizing what we call a "Lean Start"

By Doing these two simple processes you can save some cash and future headaches!

View Event →
What Diffrent Color Smokes Mean
Aug
1
to Aug 31

What Diffrent Color Smokes Mean

For this month we would like to cover different kinds of engine smoke colors and what they mean and how knowing could aid you on a faster diagnostics process.

  1. White Smoke- A white smoke that dissipates quickly after reaching an open cool area is an indication of vapor. This would indicate the burning/boiling of water. Example=Defective Head Gasket
  2. Blue Smoke- A blue smoke that lingers and rises slowly is caused by the burning of oil. Example=Defective Piston Rings
  3. Black Smoke- A black smoke that falls slowly is indication of excessive burning of fuel. Example=Vehicle Running Rich
View Event →
Coolant Tip
Jul
1
to Jul 31

Coolant Tip

When replacing coolant in a vehicle while conducting a scheduled maintenance coolant flush, it is good practice to leave the radiator cap off of the radiator as you turn the vehicle on. The effect of this technique is that once the vehicle reaches the specified temperature, the water thermostat in the vehicle will open allowing circulation of the coolant and allowing any excess air to escape through the cap opening on top of the radiator. Please make note of this, if you keep the radiator cap off for more than 4 minutes the radiator will begin to boil over and the effect will be reversed.

View Event →
Oil Change Tip
Jun
1
to Jun 30

Oil Change Tip

  1. Always start your vehicle prior to changing the oil and let the car idle for 5 minutes. What this causes is the oil to warm and flux out of the engine easier making sure the most amount of oil drains.
View Event →